When I first started in this hobby, I always dreamed of
having a gaming table in my own home. As
a young gamer, owning your own gaming table was a status symbol that informed
all and sundry that you were a serious player in the gaming community,
possessing the means of running games independently free of the constraints of
GW or any other gaming store. The more
time I spent in the hobby, the more my ideals changed, as gaming tables became
more and more available and countless tutorials on the web showing you just how
easy making a gaming table really is.
Considering our combined powers of procrastination, it was
quickly decided that this was a project that we would take one day at a
time. It just so happened that the time
between each day ended up being roughly about a year. The powers of procrastination are strong in
us! The first day was spent trolling our
local hardware store, collecting all the items needed to build the frame of the
table and the table top itself. Most
hardware stores will cut timber to length at your request and I heartily
encourage everyone to take advantage of that offer, if only to get the table
top cut to size. Once home, Mark and I
measured and cut the framework to size before assembling it and making the
small adjustments needed to ensure it was square. Retrospectively, considering we had the
tabletop already in our possession, the smarter idea would have been to fix the
framework immediately to the underside of the tabletop, rather than marking the
frame separately and fitting it once it had dried. This would have saved us some anxiety in
the future, but life is all about learning isn’t it?
Year 1 / Day 2
With the framework now attached to the tabletop (with some
minor ‘adjustments’ to make it flush with the frame), it was time to texture
the bastard. When using textured paint,
the important tip here is to always remember to read the instructions on the
side of the paint tin. This will ensure
that your end result not only looks good, but also allows you to slide movement
trays across its surface without any issue at all. Being the gung-ho painters we are, we chose
to ignore this simple rule in favour of a ‘lets get this done so we can watch
Anime’ approach. As a result, the end
result was still quite impressive, with the table sporting an amazing amount of
texture, but unfortunately the texture was such that all movement trays were
only capable of moving 3 inches before stopping dead and causing the entire
front rank to fall over. This problem
was overcome easily enough however, with the table being repurposed from a
Fantasy ‘snow table’ to 40K ‘city-fight table’.
Decision made, we left the table to dry and returned to watching Anime.
Year 2.5 / Day 3
Fast forward another year and a bit and we’ve reached the
present day. Once again Mark and I
organised a hobby day. Paint was
purchased, paint rollers secured (we’d broken the handles of the other ones
last time) and an Anime series chosen (Bleach for the win!!). Within the first 45 minutes the basecoat was
down and drying and we headed off to watch the last of Season 2 of Bleach. Once that concluded we returned to the
painting area to check on the table which was dry and ready for the next two
layers of colour. Note to self: DRY-BRUSHING
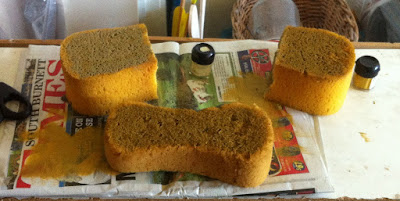
A 6 X 4 TABLE USING AN ACTUAL BRUSH IS NOT A GOOD IDEA!! Mark suggested that we use a section of
sponge instead to get that mottled effect which worked really well... when Mark
was wielding the sponge. My side looked
kinda wonky as splotches of Bubonic Brown appeared periodically across the
tabletop. Thankfully my sponge control
improved with the application of Bleached Bone as a second highlight, while
Mark’s side remained an example of a sponge painting master-class. I suspect he’s done something similar in the
past, but I’ve as yet failed to discover the secret to his sponge control. My current theory is that he is part of an
ancient group of Shaolin Monks who specialise in some sort of sponge-orientated
combat, though I’m reluctant to ask him about it lest he see’s me as some sort
of security threat and is forced to kill me with my own paint-covered sponge...
So there you have it!
How to build and paint a gaming table in 2.5 years... or 3 days. However the true test of the table is in its
ability to blend in with the terrain that was build specifically with it in
mind. As the pictures above can attest,
it seems to blend pretty darn well. I
have to say I've very happy with the way this table has come out and I really
look forward to playing a game of 40K on this table when I get a chance. With this table done, I can prepare myself to
paint the second table I have, one that my father smashed out in a single
afternoon. By jingo that man can wield a
hammer and router! Hmmm... Sounds like a potential title for Black Library’s
new magazine focusing on carpentry fiction.
Either way, painting this table will be my next gaming table project,
which I aim to have finished by the end of the year.
Catch you all later


.JPG)
.JPG)
.JPG)
.JPG)
.JPG)
.JPG)
.jpg)


